Common setup options for Fluance Classic and Elite Turntables
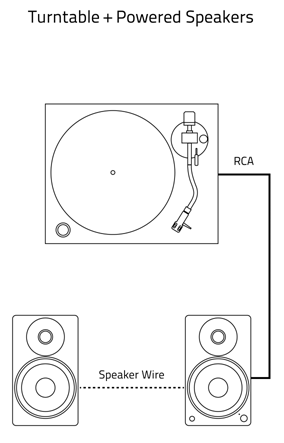
- Powered Speakers: Ai41, Ai61, Ai81, Ri71, Ri91
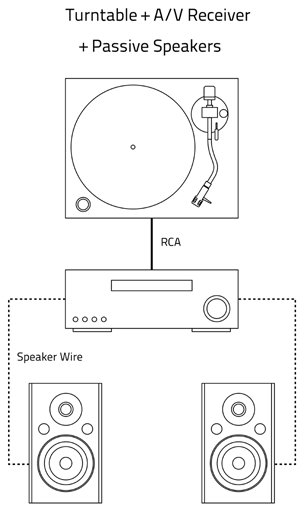
- Amp + Passive Speakers: Elite (SX), Reference (XL), Signature Series (HF)
- ***All Fluance turntables require external speakers***
When to use the built-in preamp:
- Classic and Elite Series turntables include a built-in preamp. The purpose of the preamp is to boost the low phono output from the turntable so it can be played on amplified speakers.
- The preamp cannot power passive speakers like the SX6, XL8S, and HFS bookshelf speakers. They require an external amplifier or home theater receiver. You cannot connect a turntable directly to passive speakers.
- If you are connecting your turntable directly to a set of powered speakers, such as the Ai41, Ai61, or Ai81, set the preamp switch to 'LINE'.
My speakers or amplifier have a 'PHONO' input:
- If your speakers or amplifier have a PHONO input, this means it already has a preamp.
- If you want to use the preamp in the amplifier, set the preamp switch on the turntable to 'PHONO' to bypass the preamp in the turntable.
- If you want to use the turntable's preamp, set the preamp switch to 'LINE' and connect the turntable to a different input.
Tonearm Setup
Tonearm balance and tracking force are a crucial part of your turntable setup. Set it incorrectly and you may experience skipping, distorted audio and cause excess wear to your vinyl records.
Step 1: Install the Counterweight
With the tonearm locked into place, slide the counterweight onto the back of the tonearm with the numbers facing you. Once secure, you will hear it click into place.
Step 2: Install the Headshell
Connect the headshell to the tonearm and tighten the locking nut. Do not touch the contacts on the headshell connector as this may cause distortion in your audio signal.
Step 3: Remove the Stylus Guard
In the case of the Audio-Technica cartridges and Ortofon OM10, slide the guard off the stylus. On the 2M Red and 2M Blue, place your thumb on the front of of the stylus guard and pull the tab on the rear of the guard toward you.
Step 4. Unlock the Tonearm
Unlock the tonearm and lift the cueing lever.
Step 5. Position the Tonearm Over the Platter
Step 6. Level the Tonearm
Hold the headshell and lower the cueing lever. Do not allow the stylus to touch the platter.
With the cueing lever lowered, turn the entire counterweight (not the numbered indicator ring) until the tonearm floats horizontally. You will need to adjust the counterweight back and forth until it does not fall towards the platter or lift toward the back of the turntable.
Step 7. Set the Tracking Force
Once the tonearm is level, return it to the tonearm rest and lock it in place.
Turn the numbered indicator ring on the counterweight to "0".
Turn the entire counterweight counter-clockwise until you reach the recommended tracking force from the chart below:
Model - Cartridge - Tracking Force
RT80 - ATN91 - 2g
RT81 - AT95E - 2g
Step 8. Adjust the Anti-Skate Dial
After you set the tracking force, turn the Anti-Skate dial to match the tracking force of the cartridge. This keeps the stylus from sliding across the record or skipping due to the inward force of the grooves.
Your turntable is now ready to use!
Check out the videos below for a detailed walkthrough of Classic/Elite turntable assembly and set up.
To keep your turntable sounding its best, it's important to regularly clean it and replace parts that have become worn.
We recommend purchasing a cleaning kit along with your turntable to ensure the best performance.
Fluance Vinyl Record & Stylus Cleaning Kit
Cleaning:
- Clean your records before playing them with an anti-static record brush. Even brand new records can have dust and debris from the pressing plant and inner sleeve.
- Clean your stylus before each record using a stylus cleaning brush. Brush your stylus from back to front to prevent damage.
- Do not use chemical cleaners on the stylus to prevent damage.
- Ortofon recommends against the use of gel cleaners for their styli.
- Clean the plinth and dust cover using a clean, dry lint free cloth.
Maintenance:
- Each stylus has a recommended number of hours before they should be replaced. For specific information on this, refer to the manufacturer's website.
- Our turntable belts do not have a specific timeframe after which they should be replaced. If you notice your belt is loose, sticking, or slipping, it may be time to replace the belt.
Replacement parts and accessories:
- Replacement parts and accessories are available at the following link: TURNTABLE ACCESSORIES
- If a part is not listed, you may be able to order it through our Customer Experience Team at 1.888.61.SOUND (1.888.617.6863). At this time we do not offer internal components such as motors, and connectors, and boards.